


If you’ve been yearning to try your hand at making homemade sourdough starter from scratch but just don’t know where to start, you’ve come to the right place! My Ultimate Primer On Making Sourdough Starter will guide you through the entire process of making, feeding, storing, reviving, and using sourdough starter to make the best darn crusty loaf of your life.
Jump to:
- ⭐ Why You’ll Love This Recipe
- ❓ Why Do We Need Starter For Sourdough?
- 🍴Ingredients
- ⚒️ Equipment
- 📖 Step-by-Step Instructions
- ❓ How to Feed & Maintain Sourdough Starter
- 🫙 How to Store
- ❓ How to Use Starter
- ❓ How to Make Sourdough Using Starter
- 📝 Troubleshooting Tips & Tricks
- 💭 Recipe FAQs
- Recipes Using Sourdough Starter
- Ultimate Primer On Making Sourdough Starter
- 💬 Comments
⭐ Why You’ll Love This Recipe
Sourdough starter is a thin, fermented flour and water dough that acts as a home for lactobacillus bacteria (which is responsible for sourdough’s tangy flavor) and wild yeast (which acts as the leavening). It is in fact a living ecosystem for a whole host of microbes that will contribute to the taste, texture, and rise of your loaf.
Since your starter is a living being (or, more accurately, many living beings), you’ll need to feed it regularly. Over time, the microbes will become stronger and should rise and fall at predictable times after feeding. Once the starter has a regular schedule, you’re ready to start using it! You can use sourdough starter in pancakes, to make sourdough french toast, sourdough garlic bread, homemade crackers and sourdough banana bread!
As the microbes in your starter become stronger with feeding, they will begin to create a mix of both lactic and acetic acids, which are responsible for the characteristic flavor of sourdough. As they consume the carbohydrates in the flour, they’ll also release gas, giving your dough a natural rise.
❓ Why Do We Need Starter For Sourdough?
So why do we start sourdough with this strange, loose dough? Sourdough is a type of slowly fermented bread that doesn’t require commercial yeast to grow, rather goes through a process known as natural leavening.
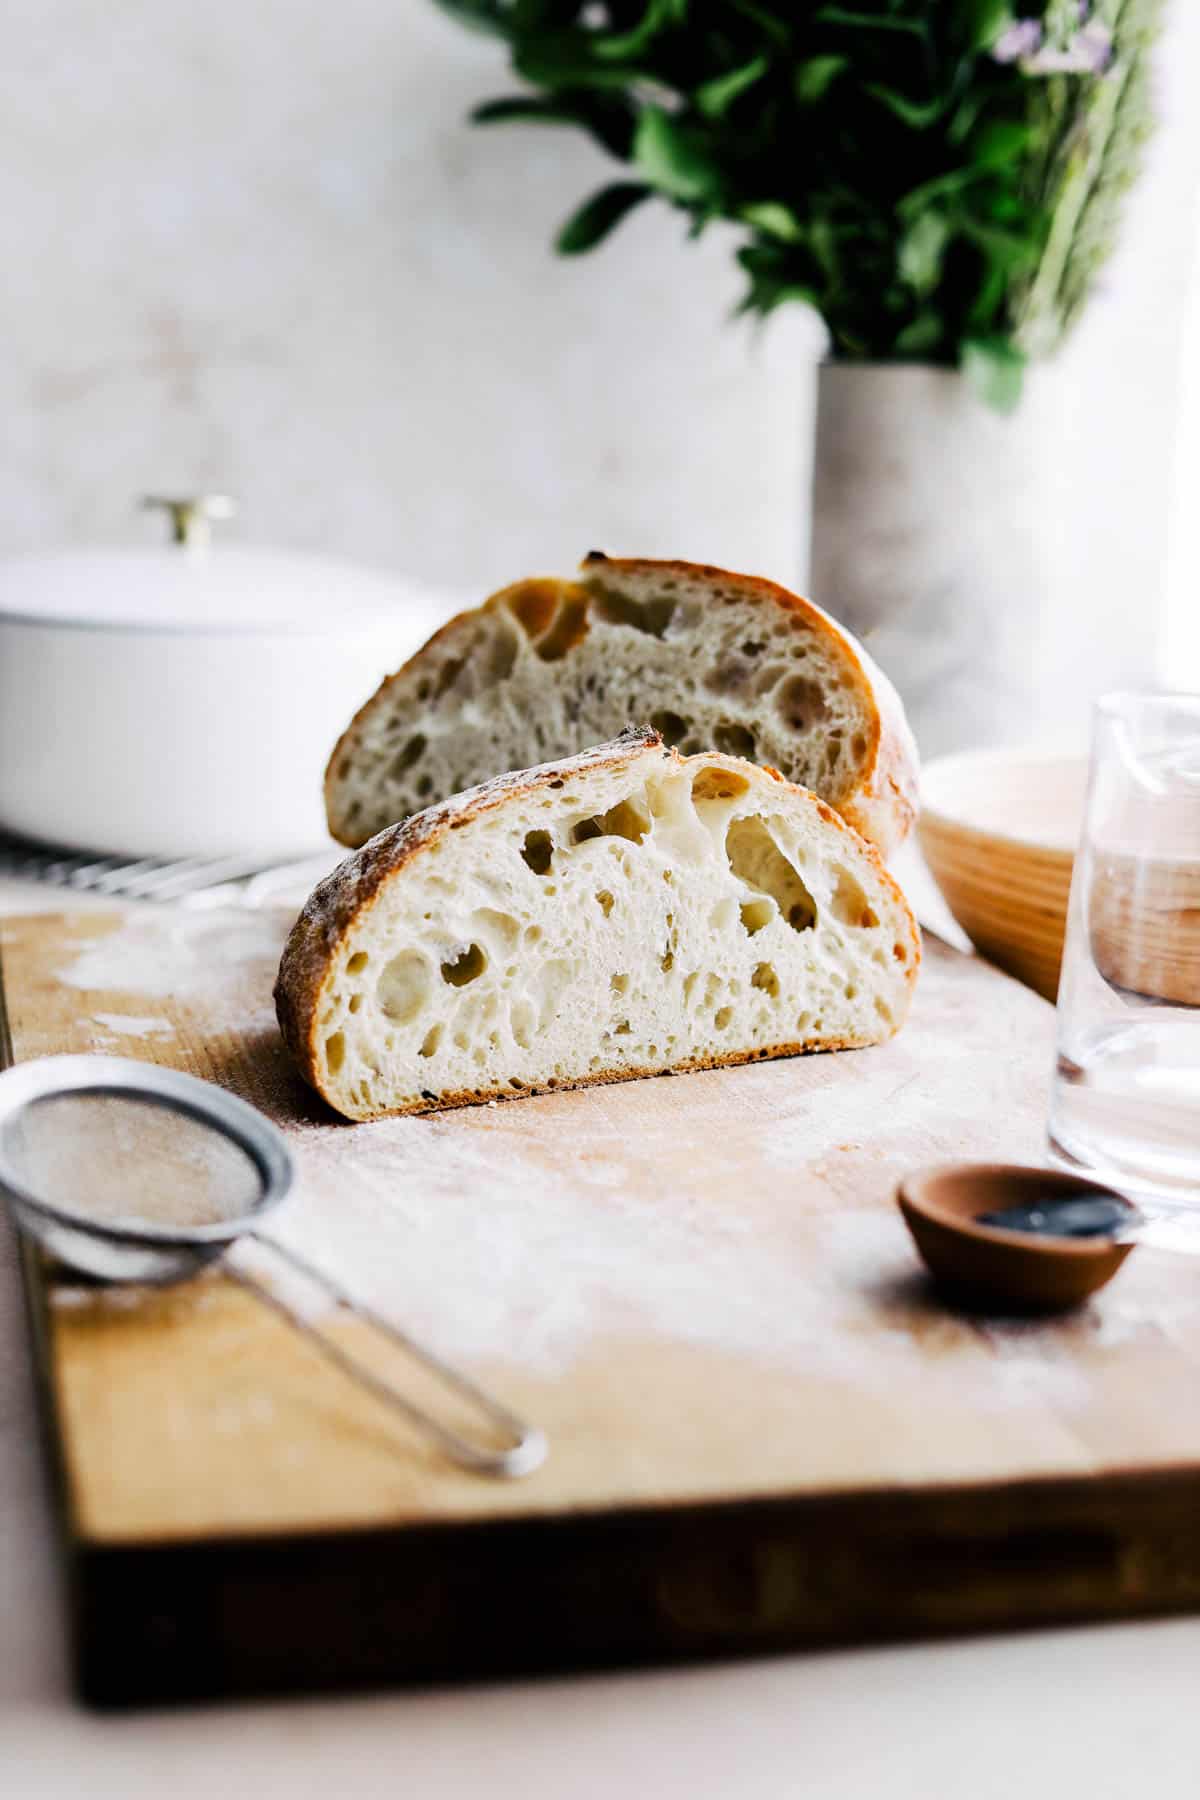
Breads that are made exclusively with sourdough starter require a longer fermentation period than breads made with packaged yeast. While you may need to exercise a bit more patience for this type of bread, the results are well worth it!
Not only does true sourdough have all the characteristics of “good bread” (i.e. a crusty exterior, chewy texture with large air bubbles, and the signature tangy flavor), but the process actually makes the bread better for you. In fact, sourdough bread is easier to digest and the nutrients are more easily accessible than in other quick-rise breads.

🍴Ingredients
Making this starter for sourdough requires just 5 easy-to-find ingredients. Here’s what you’ll need to gather:
- Water - Since you are creating a living environment for our bacteria and yeast friends, make sure you’re using clean, filtered water. Note that many cities add chlorine to tap water to make it safe to drink, which will inhibit the bacterial growth we’re looking for in our starter.
- Honey - This is typically my liquid sweetener of choice and acts to feed the bacteria and yeast in the starter. If you are vegan, simply swap in maple or agave syrup instead.
- Sugar - A little goes a long way to feed the yeast and bacteria in this sourdough starter recipe and will help to jumpstart the fermentation process.
- Raisins - Using raisins to create the yeast water introduces some seriously delicious wild yeast cultures to your mix. When you’re done making the yeast water, the raisins can then be used to make sourdough raisin bread using your starter!
- Bread Flour - With a high protein content, bread flour is ideal for making sourdough starter, as more protein leads to higher rises. If possible, opt for an unbleached flour; the bleaching process can destroy some of the microbes present, which leads to a slower and more difficult inoculation period (read: it’ll take longer for your starter to be ready).

⚒️ Equipment
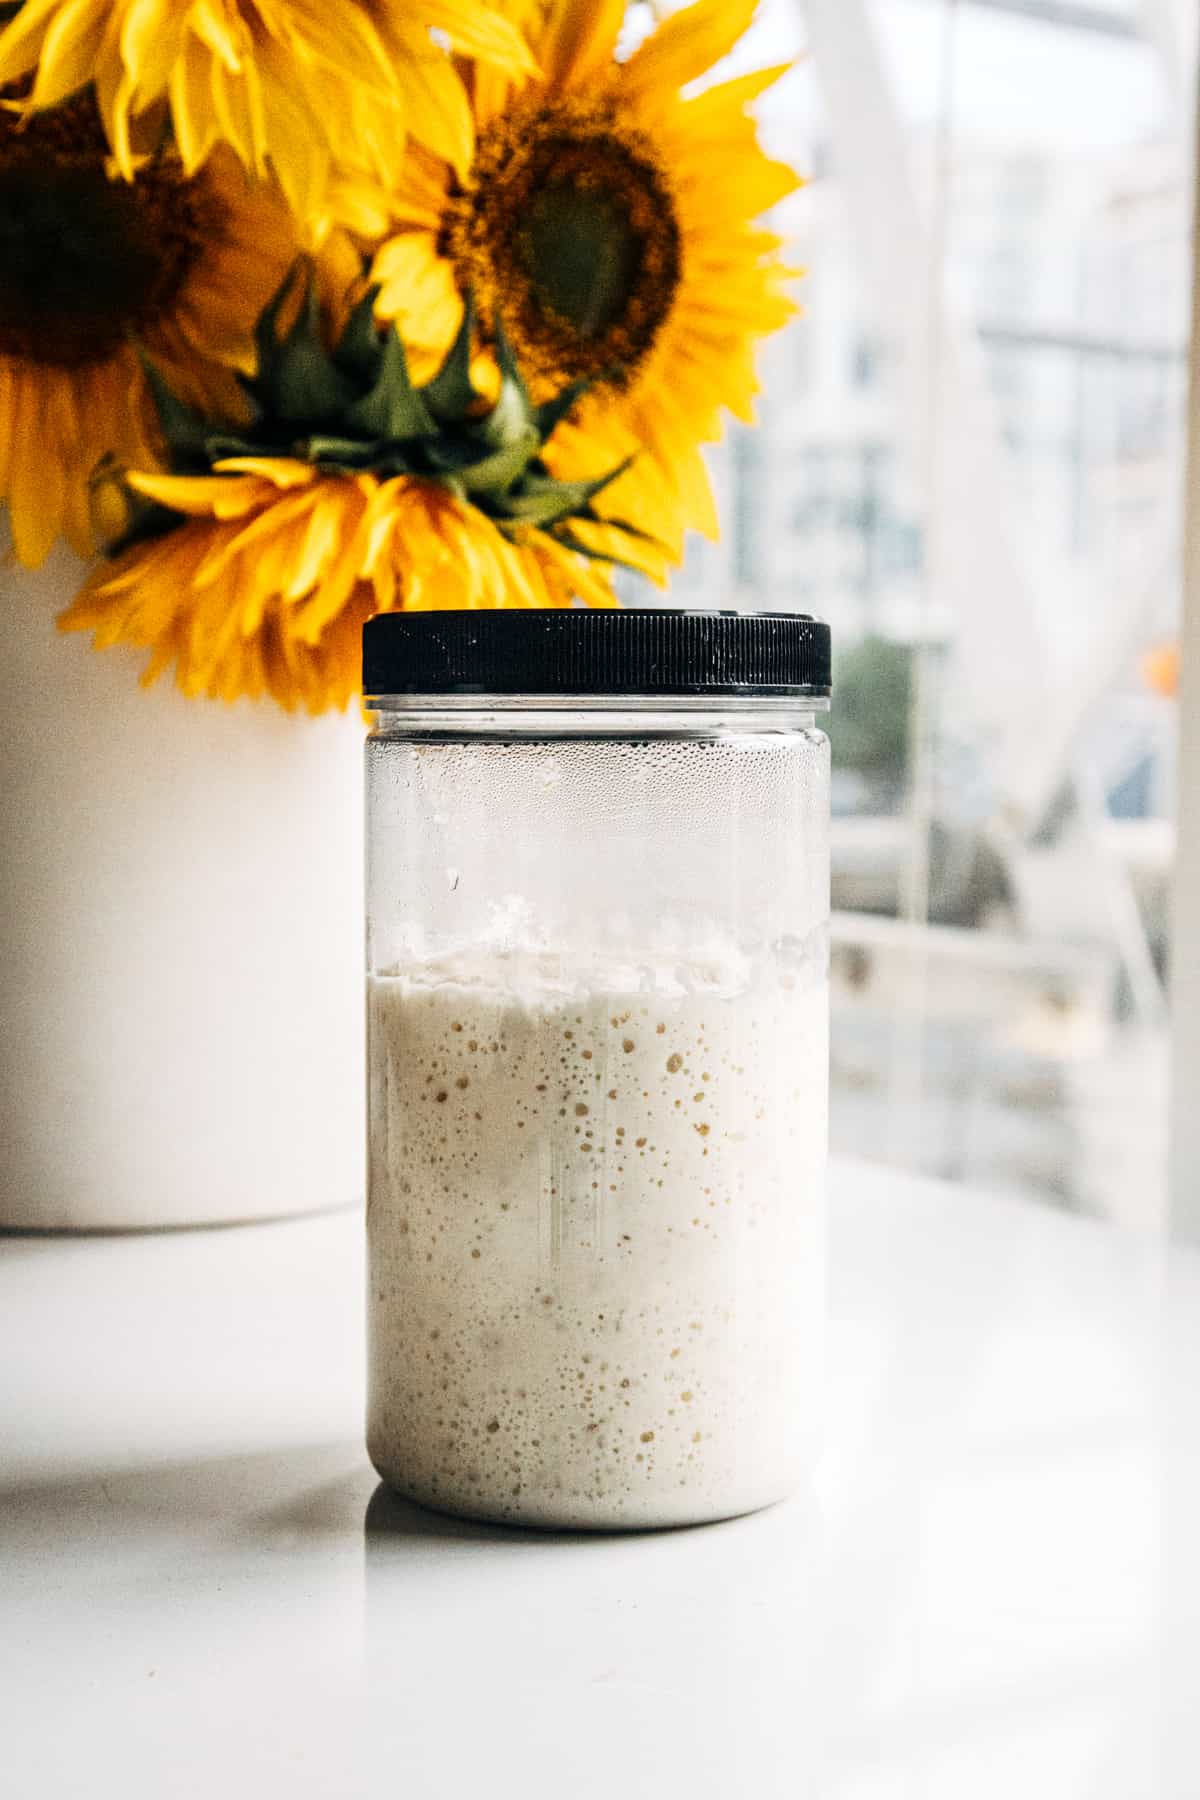
Luckily, making a sour bread dough starter doesn’t require much, aside from a jar for it to live in and a scale to measure your ingredients by weight rather than volume. So, the million-dollar question is: what is the best kind of container for storing your sourdough starter? It honestly depends on what kind of baker you are!
The first thing to consider is CAPACITY. While you don’t need a ton of starter to consistently churn out sourdough, remember that the starter will need space to at least double in size, without spilling all over your countertops.
The second thing to consider is MATERIAL. You can opt for BPA-free plastic, glass, or enameled stoneware. My personal preference is glass because you can easily see your starter (letting you know if it is rising and falling on schedule), it is easy to clean, and it won’t hold onto smells (like some plastics can).
Thirdly, you’ll need to think about DURABILITY. Since you are creating a microbiome, you’re going to want to make sure that your container is easy to sanitize and keep clean.
You’ll also want to consider AESTHETICS. If you plan on using your sourdough starter often, you’ll want to keep it out on the countertop. So go ahead and opt for something that will give you joy to look at.
I’m personally a sucker for mason jars and french canning jars, as they hit all five of these checkmarks for a good sourdough starter container. Here's my recent favorite!
📖 Step-by-Step Instructions
Day 1: Add 450 grams of warm water, 80 grams of honey and 150 of grams sugar in a bowl, stirring until the sugar and honey have completely dissolved. Place 220 grams of raisins in an airtight container and pour honey water on top. Seal tightly and set in a warm spot in your kitchen. Done for the day!
Day 2-3: Shake the sealed mixture twice a day, making sure to place your container back in a warm spot while the fermentation process continues. Again, make sure to place your container in a warm spot throughout the week to increase activity and help with fermentation.


Day 4-6: It’s time to introduce some fresh air into your mixture! Unscrew the cap of your container and place it gently on top. Throughout the next few days, the raisins will continue to rise to the surface and bubbles will signal growing activity within!
Day 7: By now your yeast water is bubbling and the raisins have risen to the top of your container! Time to measure out 60 grams of yeast water and mix with 60 grams of bread flour. Place the lid gently on top, making sure not to seal, and let sit overnight. The next morning you will see signs of fermentation — large bubbles amidst the mixture proving it is active and happy!

Day 8: Weigh 100 grams of your yeast water and bread flour mixture that has sat overnight into an airtight container, discarding the excess. Add 100 grams of bread flour and water, mixing to combine and seal tightly. Continue this same process morning and night, discarding any excess until a teaspoon of your starter floats on water. This means your starter is strong enough to be used in various recipes!


Heads Up! Those leftover raisins and yeast water? Don’t throw them out! The fermented yeast water can act as a sweet cooking wine for various recipes and the raisins can also be repurposed for use in other recipes as well!

❓ How to Feed & Maintain Sourdough Starter
Once you have successfully completed the steps leading to day eight, your starter will be ready to use! That said, you’ll need to keep feeding it to maintain the happy little ecosystem that you have created.
Feeding your sourdough starter doesn’t take long; you’ll need about 3-5 minutes for each feeding. To feed your starter, add equal parts of water and bread flour by weight; I like using a nice even amount of 100 grams of each flour and water.
To start, it is advised that you feed your starter twice a day to help it gain strength. Once the starter is ready to use, you can slow down the feedings to daily or weekly depending on how often you plan on using it.
If you’re a baker that will be using the starter a few times a week, make sure to feed it daily so that it will be strong enough to act correctly.
If you plan on using the starter once a week or less you can keep your starter in the fridge. You will only need to feed it once per week as the low temperature will slow down the feeding process. Make sure to feed your starter the night before you plan to use it in a recipe so that way it is strong!
Note that the ratio of your feeding will also affect the rise. If the ratio (of starter to flour to water) is 1:1:1 it will move more quickly, whereas a ratio of 1:10:10 will dilute the microbial activity and slow it down considerably. Anything between 1:1:1 and 1:10:10 is an acceptable level of feeding, so you’ll need to find the ratio that works best for you.
🫙 How to Store
- Your homemade sourdough starter can stay in whatever jar or container that you started with (so long as it is large enough).
- If you are feeding it daily, it can live on your countertop so long as the indoor temp never exceeds about 80 degrees. Otherwise, leave it in the fridge.
- The container should be covered, though does not need to be airtight — the starter is alive, so don’t strangle it!
- As you feed your starter, it will end up growing. Be sure to remove any excess as you work so that your container doesn’t get overwhelmed. I’d recommend pouring off about 200 grams of the starter before each feeding to keep it at the same size. That excess (or discard) starter can either be used in recipes if it is strong enough (which you can test by placing a teaspoon in a glass of water; if it floats, it is ready to use!), or can be split off into a separate container to create a starter that you can gift or use in another recipe later by keeping in the fridge. It can also be composted!
- Feel free to keep any discarded sourdough starter in the freezer for up to a year, in the fridge for up to a week (without feeding), or you can even dry it out on parchment for 3-5 days at room temperature then break it into pieces and store it in an airtight container for up to 6 months.

❓ How to Use Starter
Using starter is super simple! Here’s how it’s done:
- Using sourdough starter in recipes - Feed the sourdough starter and wait for it to double in size and become bubbly. Now weigh or measure the amount of starter called for in your recipe and you’re ready to go!
- Using discarded starter in recipes - Any recipe that calls for discarded starter simply requires you to measure it and move on.
❓ How to Make Sourdough Using Starter
Interested in making your own sourdough bread at home? Head on over to my Dutch Oven Sourdough Bread recipe post for all the details!
📝 Troubleshooting Tips & Tricks
Making sourdough starter might feel intimidating, but it is actually pretty simple to do. Here are a few issues that you might come across and ways to tackle each one:
- Sourdough starter not bubbling. If your starter isn’t bubbling, that can be an indication that it is hungry. Try increasing your feedings by 1 per day.
- Sourdough starter not rising. If the starter isn’t rising, it is still relatively weak and requires some time to become more robust. Stay the course and continue feeding it twice per day. Many starters will take 2+ weeks before they are ready for use.
- Also, make sure that your starter is hanging out in a relatively warm environment — sourdough starter prefers an ambient temperature of 70-80 degrees F. Don’t start refrigerating the starter until it is well established and passes the float test.
- Also, note that after a prolonged period in the refrigerator, your starter may need a few feedings at room temperature to return to optimal rising power.
- You can also try pouring off less of the starter prior to feeding; it may be that you just don’t have enough microbes present for the amount of food that you’re adding.
- Mold on sourdough starter. Sadly, any kind or color of mold is a sign that your starter is a non-starter (HA!). Toss the contents, clean your implements, and start again. Also, make sure your ingredients are good; spoiled or rancid flour can contribute bad bacteria to the starter ecosystem and promote mold growth.
- Is my sourdough starter bad? Can I revive it if it is? If your starter is moldy, it is bad and cannot be revived. Otherwise, it is likely that your starter is just in hibernation. Make sure that it is in a warm spot (70-80F) and feed it twice in a 24-hour period. After about 12 hours past the second feeding, it should be doubled in size and ready to go! If nothing happens after two feedings and a solid 36 hours in a warm environment, it may be time to bid your starter adieu and start again.
💭 Recipe FAQs
You certainly can! Instead of composting my sourdough discard, I place the discard in the fridge to use throughout the week for making sourdough pancakes, sourdough focaccia, flatbread and sourdough banana bread among other things!
Using a kitchen scale, especially a digital scale, ensures accurate measurements of flour and water, which is essential for maintaining the balance and health of your sourdough starter.
Yes, while many begin with white flour or purpose flour, you can also use whole wheat flour, rye flour, or a mixture of flours. Different flours might impart varied flavors and sourness to your bread.
The brown liquid is called "hooch" and is a byproduct of the fermentation process, indicating that your starter is hungry and needs feeding. It can be stirred back in or poured off before feeding your starter.
If you need to store your starter for a longer period of time, freezing the starter for later use is a great option!
The good news is sourdough discard can be used in various recipes like flatbread, sourdough pancakes, chocolate chip cookies, pizza crust, or other baked goods. It adds a delightful sour flavor without needing additional yeast.
You can also freeze sourdough starter so that you have some at the ready whenever the need arises!
Yes, small bubbles indicate that the natural yeast is producing carbon dioxide, a sign of a healthy and active starter. The sour smell is a result of lactic acid, typical of fermentation.
Recipes Using Sourdough Starter


If you try this recipe for Homemade Sourdough Starter, please leave a 🌟 review and share your creation with me on social media! You can find me on Instagram, Facebook, Youtube and Pinterest - for more delicious recipes sent straight to your inbox, sign up for my newsletter! 📧

Ultimate Primer On Making Sourdough Starter
Equipment
- Jar
Ingredients
- 450 g Warm Water, about 110F
- 80 g Honey
- 150 g Granulated Sugar
- 220 g Raisins
- 60 g Bread Flour
- 100 g Room Temperature Water
- 100 g Bread Flour
- Bread Flour & Room Temperature Water, as needed once starter is active
Instructions
- Day 1: Add 450 grams of warm water, 80 grams of honey and 150 of grams sugar in a bowl, stirring until the sugar and honey have completely dissolved. Place 220 grams of raisins in an airtight container and pour honey water on top. Seal tightly and set in a warm spot in your kitchen. Done for the day!450 g Warm Water, 80 g Honey, 150 g Granulated Sugar, 220 g Raisins
- Day 2-3: Shake the sealed mixture twice a day, making sure to place your container back in a warm spot while the fermentation process continues. Again, make sure to place your container in a warm spot throughout the week to increase activity and help with fermentation.
- Day 4-6: It’s time to introduce some fresh air into your mixture! Unscrew the cap of your container and place it gently on top. Throughout the next few days, the raisins will continue to rise to the surface and bubbles will signal growing activity within!
- Day 7: By now your yeast water is bubbling and the raisins have risen to the top of your container! Time to measure out 60 grams of yeast water and mix with 60 grams of bread flour. Place the lid gently on top, making sure not to seal, and let sit overnight. The next morning you will see signs of fermentation — large bubbles amidst the mixture proving it is active and happy!60 g Bread Flour
- Day 8: Weigh 100 grams of your yeast water and bread flour mixture that has sat overnight into an airtight container, discarding the excess. Add 100 grams of bread flour and water, mixing to combine and seal tightly. Continue this same process morning and night, discarding any excess until a teaspoon of your starter floats on water. This means your starter is strong enough to be used in various recipes!100 g Bread Flour , 100 g Room Temperature Water
- Heads Up! Those leftover raisins and yeast water? Don’t throw them out! The fermented yeast water can act as a sweet cooking wine for various recipes and the raisins can also be repurposed for use in other recipes as well!
Video


Cheri Valentine
Thank you Emily for this sourdough starter recipe. I have tried many other starter recipes and none worked for me. I followed your recipe to a tee and now I have a wonderful starter. Can't wait to make my first loaf.
Emily
That makes me so happy to hear Cheri! Thanks so much for sharing your experience - have fun in your sourdough adventures!
Maurice Roper
Thank you for your experience and for me adding Grapes to a starter
Love learning new cooking and baking knowledge
Thank you again
Maurice Roper
Katherine R. Mayberry
I loved the Sourdough my Mother made. The third night of the first batch it was always sitting pretty on our counter top. Then Mother fed it and it began to grow. This is where my Father who always stayed up very late at night seen the started in the jar and flushed it down the sink thinking it was something gross growing in the jar. Needless to say the next morning when my Mother discovered the missing Jar filled with Beautiful Sourdough Starter. We had to tell on Dad. She was so upset that She didn't speak or look at him for three days. altho she made a second batch of the started and baked an awesome loaf pan of bread with Dried cranberries, hazelnuts crushed, the raisins of course, and smashed Bananas oh man was that good. Then she mad one with chunky peanut butter and chocolate topped with a light dusting of powder sugar. That was a very tasty loaf of bread. I've enjoyed reading your post on the Starter. I am feeding me a jar at the present time. I hope my bread is as good as my Mother's, tangy a hint of sweetness,and a taste of honey with the flavor of bananas and chewy cranberries with the crunch of the hazel nuts. Wow I'd be so honored to bake one that good. Thank you for your post. katherinemayberry55@gmail.com.